Rocky Linux
硬體需求
Recommended system requirements:
- x86-64, ARM64, ppc64le, or s390x architecture.
- 2 GB of RAM.
- 40 GB of disk space for storage.
- A 16 GB USB drive (The ISO image is 7.9 GB large).
Rocky Linux
開始安裝
1 準備好你的機器環境
基本上測試的環境只需要 32GB 的硬碟空間及 2GB 的記憶體就可以運作了,請依照你自己的實際環境,若是用 usb 開機安裝在實體機上的話,可參考這篇把 ISO 檔寫入 usb 隨身碟中,本篇說明是採用 PVE 虛擬機架構進行測試(如果對 PVE - Provmox VE 有興趣的朋友,可以先參考這裡)。
2 開機進行安裝流程
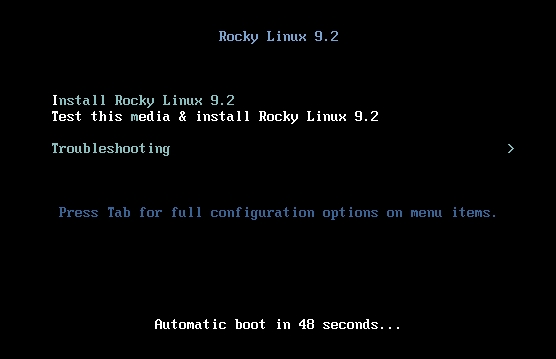
以虛擬機開機後會先出現以下畫面,請利用方向鍵往上切換至「Install Rocky Linux 9」,並按下 Enter 鍵繼續安裝流程,如果沒有在 60 秒內切換的話,系統會自動執行「Test this media & install Rocky Linux 9」這個選項。
畫面如果又出現一次請您按「Enter」鍵時,請等待或是直接再按一次「Enter」鍵即可繼續安裝。
3 選擇系統語系
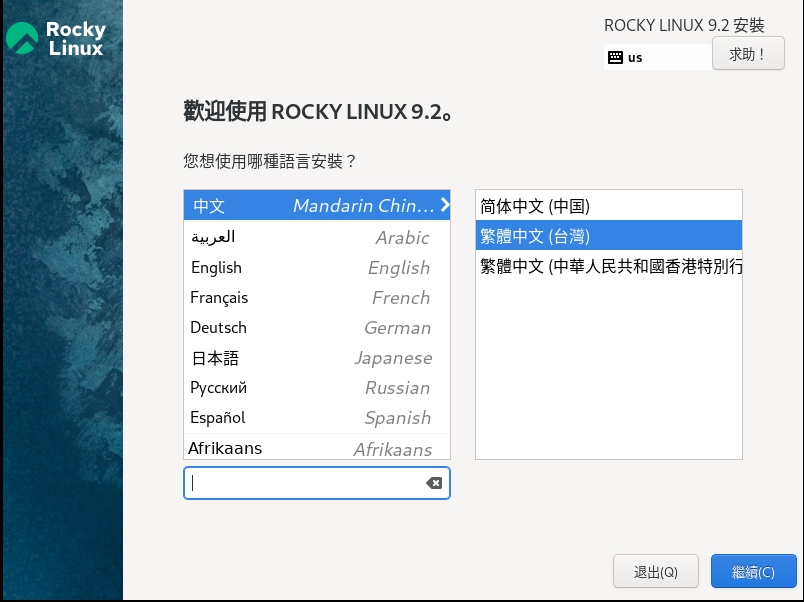
安裝程式會經過一連串偵測硬體的過程,完成後會進入選擇語系的畫面,畫面左方請下拉並選擇「中文」,畫面右方請選擇「繁體中文(台灣)」,如下 圖所示,完成後按下「繼續」鍵。
4 分割硬碟
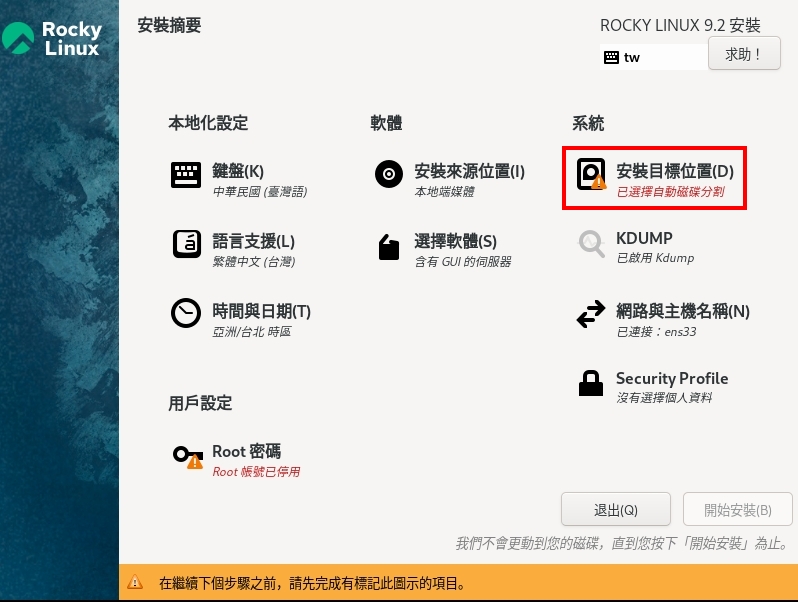
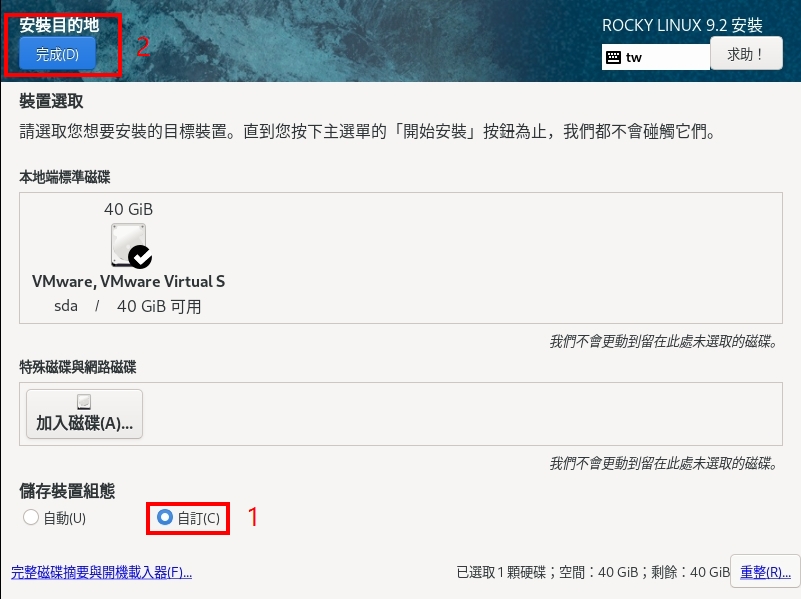
請先進行硬碟分割的設定,點選畫面中的「安裝目標位置」。
接下來的畫面中,請先點選「自訂」,再往上點選「完成」。
先將分割格式指定為「標準分割區」再按下「+」繼續新增分割區。
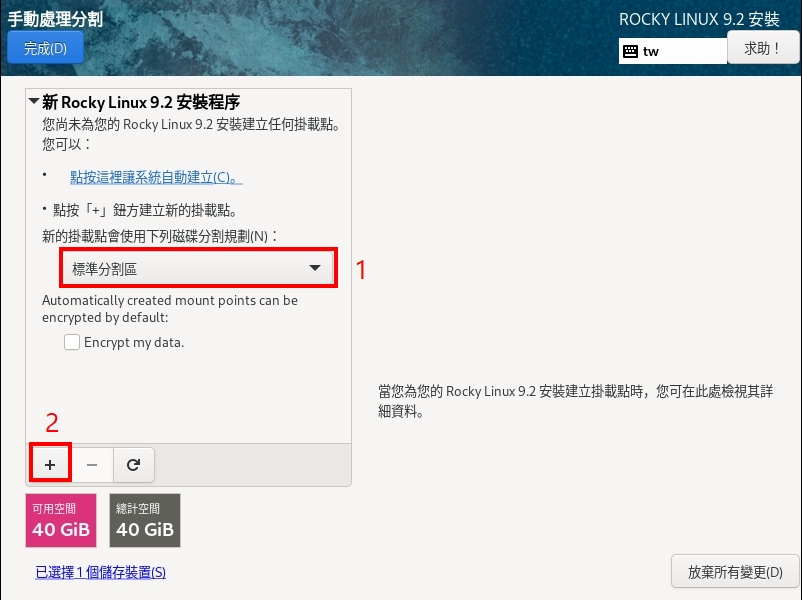
安裝過程至少需新增 2 個分割區,說明如下:
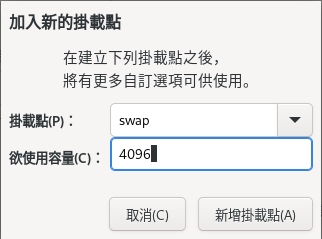
SWAP 分割區
Linux 系統需要的記憶體暫存區,建議在此 demo 站中可以新增 4096MB 供系統使用,原則上可以使用實體記憶體 x 2 的模式來做為切割大小的基本參考原則,點擊「+」號後,系統會出現分割區設定的畫面如下所示,請指定「掛載點」為 swap,「容量」建議指定為 4096(或自行規劃)。
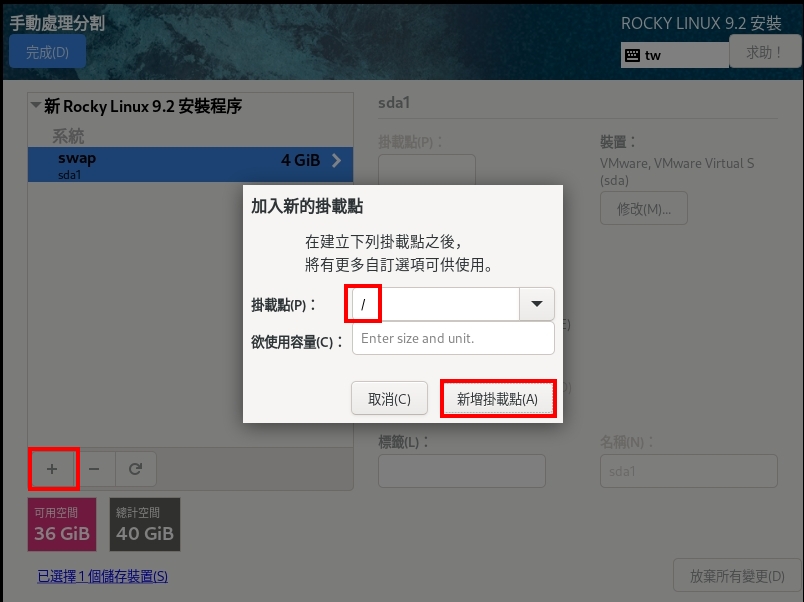
/ 系統主要分割區
系統主要分割區,剩下來的空間都全部分配到此處(欲使用容量設定為「空白」即表示分配其餘所有空間至此分割區中)畫面如下所示。
按下「新增掛載點」後,畫面會出現此分割區的詳細設定畫面,SWAP 的部 份不需要特別設定,但是在「/」的部份,需額外指定「檔案系統」的部份為「ext4」(系統預設為 xfs),如下圖所示,指定完成後按下畫面左上方的「完成」鍵。
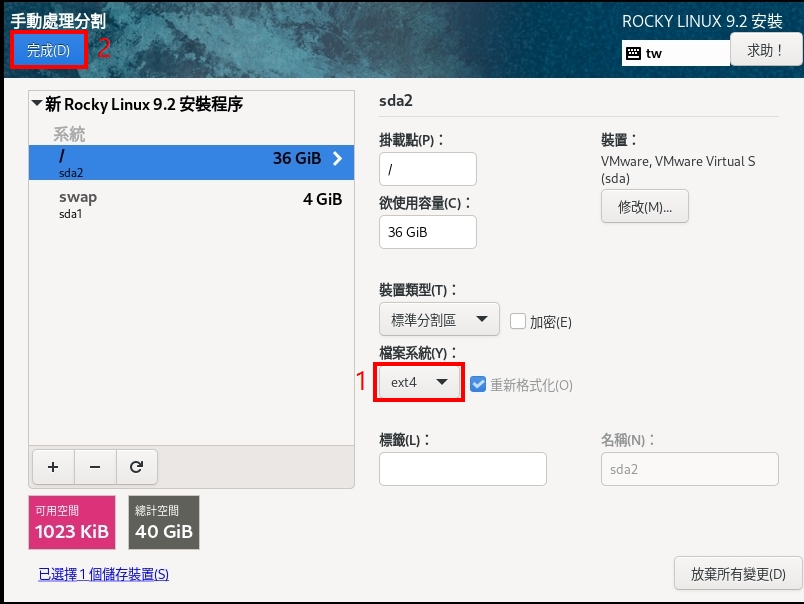
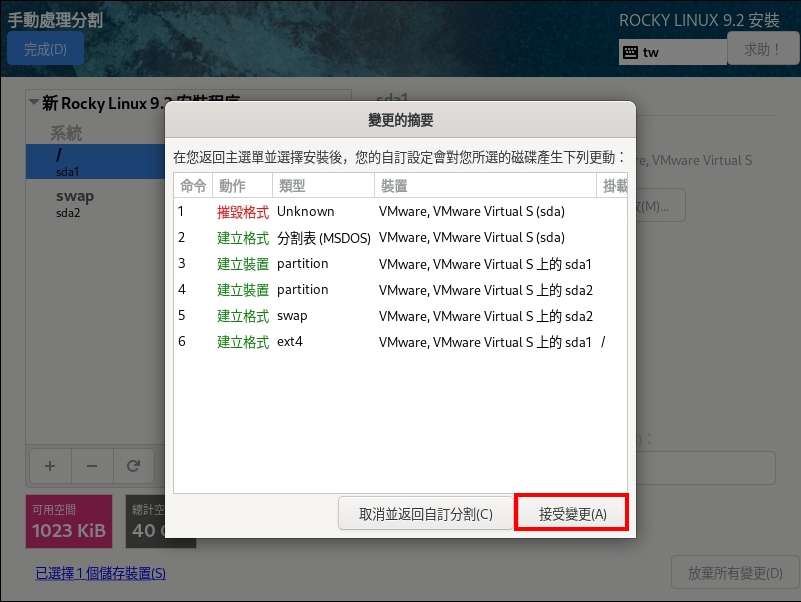
系統會再次確認分割區的資訊,確認後請按下「接受變更」繼續。
5 設定網路
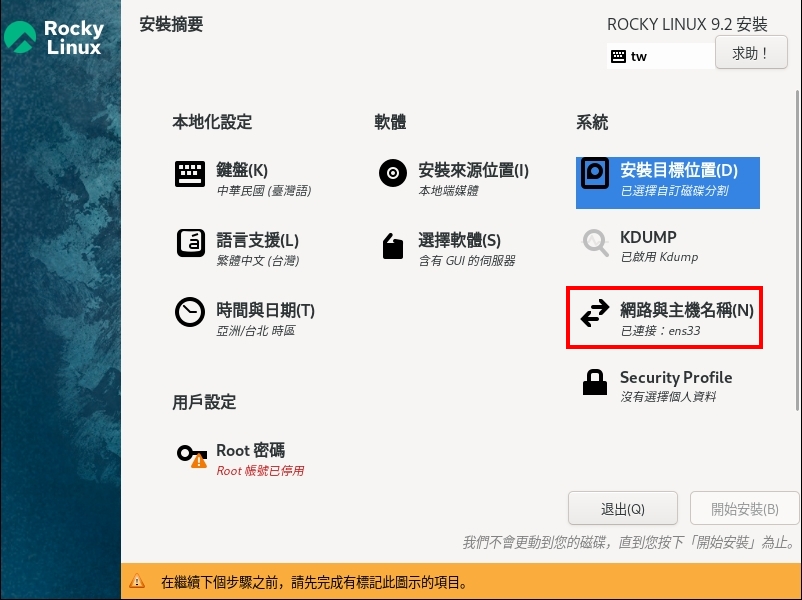
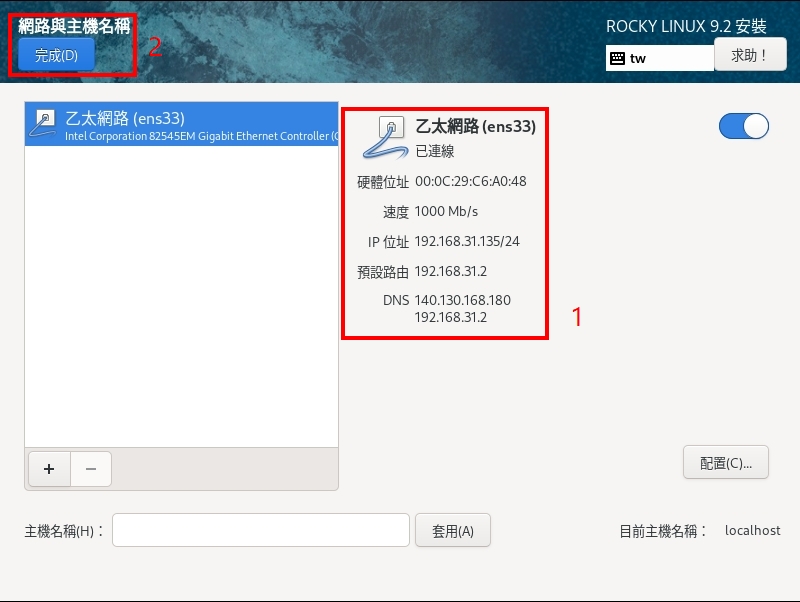
接下來會回到安裝主畫面,請點選畫面中的「網路與主機名稱」。
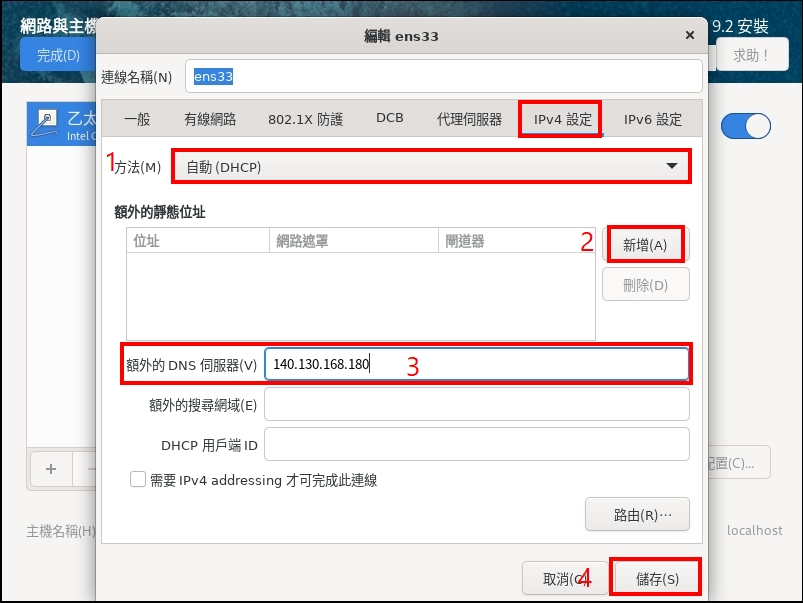
分別設定「主機名稱」(完成後先按下「套用」)、開啟乙太網路,最後按下「配置」鍵進行詳細的網路設定。

詳細的網路設定畫面如下,因為是伺服器環境,故建議使用固定 IP,請先點選畫面中的「IPV4 設定」,方法選擇「手動」,並按下畫面中的「新增」鍵後輸入固定的 IP 資訊,在輸入「DNS 伺服器」資訊後點選「儲存」即完成 網路設定。
再按一下「配置」,請點選「一般」並勾選「自動連線,優先順序」如下圖所示,點選「儲存」即完成網路設定。
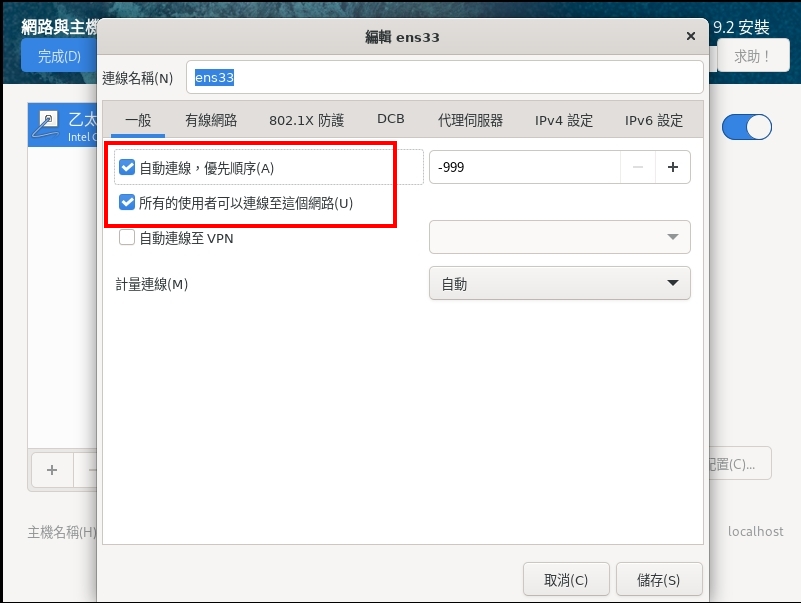
設定完成後會回到上一個畫面,請確認相關的設定是否正確,確認後按下畫面左上方的「完成」鍵再回到安裝主畫面。
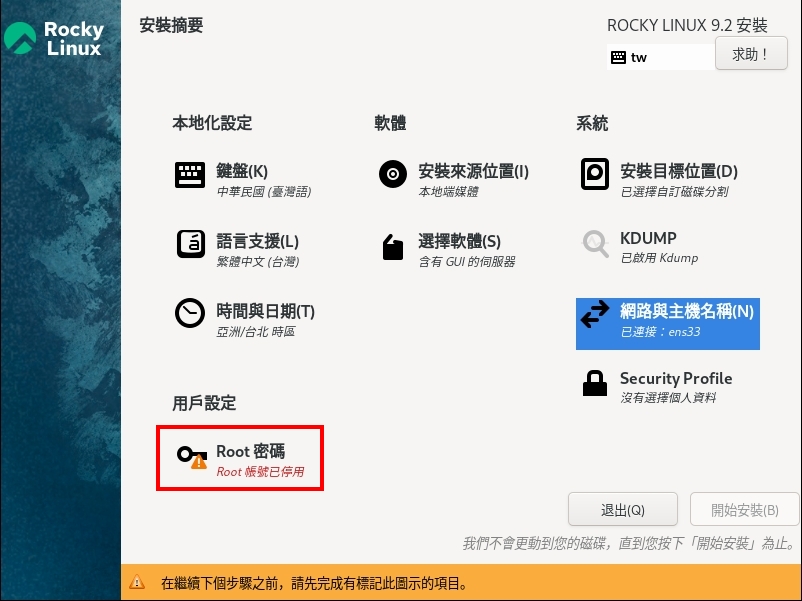
6 設定 Root 密碼
接下來會回到安裝主畫面,請點選畫面中的「設定 Root 密碼」。
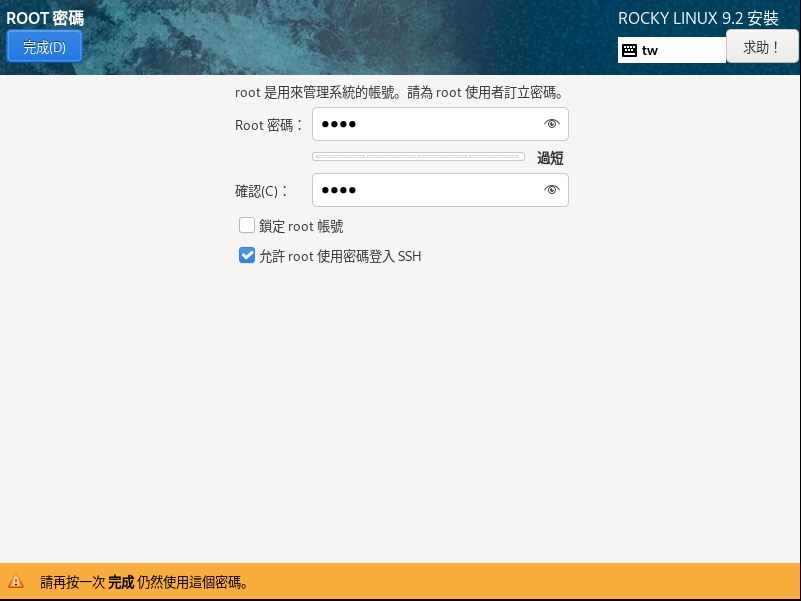
設定畫面如下,請輸入二次 Root 密碼,並按下「完成」鍵完成設定。
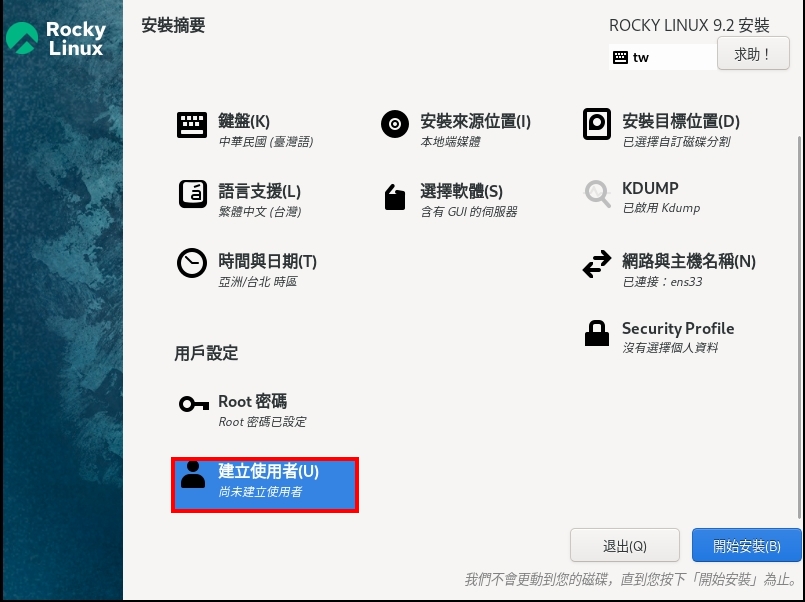
7 建立使用者
設定完 Root 密碼後,接下來會回到安裝主畫面,請點選畫面中的「建立使用者」。
進到建立使用者的畫面後,如圖請填入使用者姓名及密碼,重點是若要使用一 般使用者管理系統,請記得勾選「讓這位使用者成為管理員」,如下圖所示。
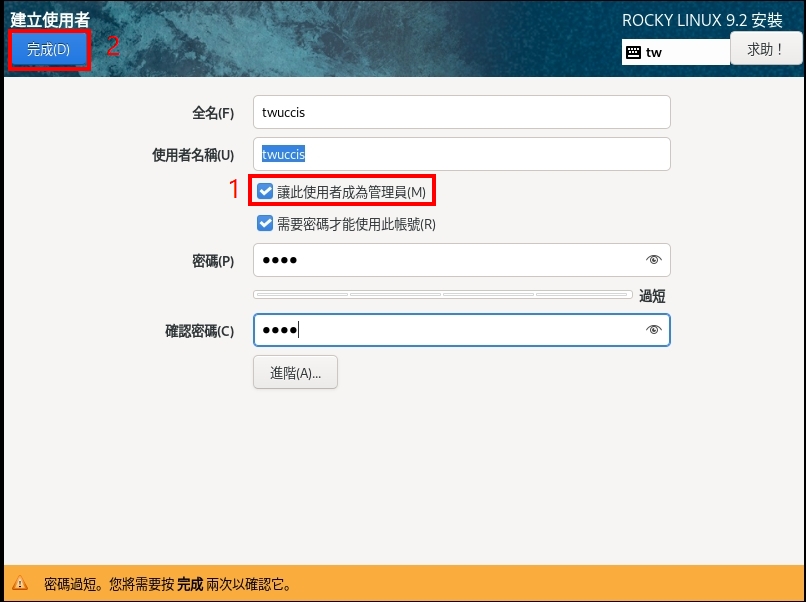
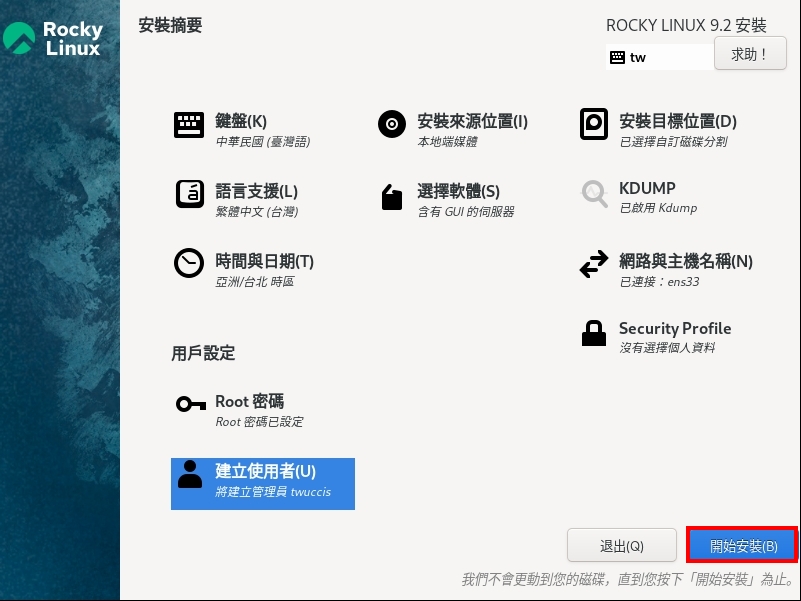
同時要點選「完成」,才會跳回系統安裝主畫面,當安裝完成後,畫面右下角會出現「開始安裝」的按鍵,按下後系統就會開始正式進行安裝作業。

8 重新開機
系統正式進行安裝,完成安裝後的畫面如下,畫面右下角會出現「重新開機」的按鍵,即代表已完成 安裝作業,重新開機就可以啟動基本的系統了。

重新開機後的畫面如下所示(Kernel 後的數字可能會有所不同)。
image-1653907778339.png
進行第一次系統升級、調校及安裝基礎套件
1 基本升級
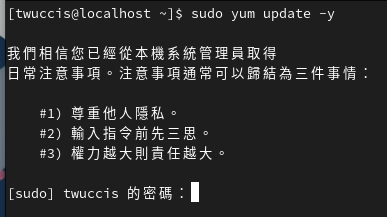
在安裝完基礎系統後,需進行基本的升級工作,建議使用安裝過程式的用戶名稱登入,並使用 sudo 指令進行系統更新作業。
sudo yum update -y
然後在這個連線階段第一次會出現以下的訊息:
 輸入正確的密碼後,就會以 Root 身份執行 yum update 的工作了,接下來會出現類似於以下的訊息,系統會接著執行到完成。
2 安裝基礎套件
基本上會建議安裝以下常用的基本套件,這樣在之後的管理工作上會比較簡單,這份清單會隨著時間更新,列表及說明如下:
| 項次 | 套件名稱 | 說明 |
|---|---|---|
| 1 | vim | 提供更多 vi 編輯器效果的延伸套件,讓你編輯純文字文件時不再只是單調的畫面。 |
| 2 | wget | 下載網路連結檔案的工具,常常會在安裝其它非 RPM Base 的工具中用到。 |
| 3 | net-tools | 基本網路查詢工具,在確認網路或是服務狀態時會常常用上。 |
| 4 | yum-utils | 套件升級工具的進階小指令。 |
| 5 | unzip | 解壓縮工具。 |
| 6 | 啟用舊式 systemctl restart NetworkManager.service 指令的套件。 | |
| 7 | policycoreutils-python-utils | 用來設定 SELinux 規則的工具。 |
| 8 | 重新啟動網路的 scripts。 |
ps network.service 得使用 systemctl restart NetworkManager.service
sudo yum install vim wget net-tools yum-utils unzip policycoreutils-python-utils -y
3 基本調校工作
調整系統時間
在 CentOS 8 / Rock Linux 8 後,預設就會使用 chrony 套件進行網路校時的工作,服務也是啟動的狀態,所以網路若是通的,基本上就可以更新時間資訊,但是透過 date 的指令,你可能會發現時區的設定是錯的。
$ date
西元2023年05月17日 (週三) 10時16分24秒 CST
調整時區
若要調整時區,請使用 timedatectl 指令來設定,若是 Asia/Taipei 時區,請使用下以下指令:
$ sudo timedatectl set-timezone Asia/Taipei
$ date
西元2023年05月17日 (週三) 10時16分24秒 CST
準備
cat /etc/system-release
Rocky Linux release 9.2 (Blue Onyx)
安裝開發工具
sudo dnf groupinstall "Development Tools" -y
安裝PostgreSQL
Install TimescaleDB on Linux 1.At the command prompt, as root, add the PostgreSQL third party repository to get the latest PostgreSQL packages:
sudo dnf install -y https://download.postgresql.org/pub/repos/yum/reporpms/EL-8-x86_64/pgdg-redhat-repo-latest.noarch.rpm
2.Create the TimescaleDB repository:
sudo tee /etc/yum.repos.d/timescale_timescaledb.repo <<EOL
[timescale_timescaledb]
name=timescale_timescaledb
baseurl=https://packagecloud.io/timescale/timescaledb/el/$(rpm -E %{rhel})/\$basearch
repo_gpgcheck=1
gpgcheck=0
enabled=1
gpgkey=https://packagecloud.io/timescale/timescaledb/gpgkey
sslverify=1
sslcacert=/etc/pki/tls/certs/ca-bundle.crt
metadata_expire=300
EOL
確認一下repo是否正確
cat /etc/yum.repos.d/timescale_timescaledb.repo
[timescale_timescaledb]
name=timescale_timescaledb
baseurl=https://packagecloud.io/timescale/timescaledb/el/9/$basearch
repo_gpgcheck=1
gpgcheck=0
enabled=1
gpgkey=https://packagecloud.io/timescale/timescaledb/gpgkey
sslverify=1
sslcacert=/etc/pki/tls/certs/ca-bundle.crt
metadata_expire=300
Update your local repository list:
sudo yum update
Install TimescaleDB:
yum install timescaledb-2-postgresql-14
將安裝依賴項目: lz4 postgresql14 postgresql14-libs postgresql14-server timescaledb-2-loader-postgresql-14 timescaledb-tools
安裝 You need to update your postgresql.conf
...
imescaleDB has been installed. You need to update your postgresql.conf file
to load the library by adding 'timescaledb' to your shared_preload_libraries.
The easiest way to do this (and more configuration) is to use timescaledb-tune:

timescaledb-tune --pg-config=/usr/pgsql-14/bin/pg_config
Initialize the database:
sudo /usr/pgsql-14/bin/postgresql-14-setup initdb
Initializing database ... OK
設置 TimescaleDB 擴展
安裝 PostgreSQL 和 TimescaleDB 後,您可以使用 psql 命令行實用程序從本地系統連接到它。 Installing psql using the yum package manager Make sure your yum repository is up to date:
sudo yum update
Install the postgresql-client package:
sudo dnf install postgresql14
安裝 timescaledb-2-postgresql-14 時已經安裝過postgresql14
Setting up the TimescaleDB extension on Red Hat-based systems
1.啟用與啟動服務:
sudo systemctl enable postgresql-14
sudo systemctl start postgresql-14
2.使用superuser 連結 PostgreSQL:
-u postgres psql
If your connection is successful, you see a message similar to this, followed by the psql prompt:
3.配置 postgresql.conf 文件,使用 postgres 啟動時加載 'timescaledb'
sudo vim /var/lib/pgsql/14/data/postgresql.conf    #  方式一
shared_preload_libraries = 'timescaledb'  # 不區分大小寫 也可以使用 timescaleDB。
或
sudo echo "shared_preload_libraries='timescaledb'">>/var/lib/pgsql/14/data/postgresql.conf # 方式二
4.檢驗
[twuccis@localhost ~]$ sudo -i  切換至root
[sudo] twuccis 的密碼:
[root@localhost ~]# su - postgres 切換至postgres
[postgres@localhost ~]$ psql                     # 进入到 postgres 的命令行,即命令窗口。
psql (14.8)
Type "help" for help.

postgres=# CREATE DATABASE timeseries;   # 建立資料庫 timeseries
postgres=# \l                            # 查看資料庫
postgres=# \c timeseries                 # 選擇資料庫 timeseries
 >> You are now connected to database "timeseries" as user "postgres".
timeseries=# create extension timescaledb;                            # 方式一,添加 TimescaleDB 插件
timeseries=# CREATE EXTENSION IF NOT EXISTS timescaledb CASCADE;      # 方式二,使用 TimescaleDB 扩展数据库
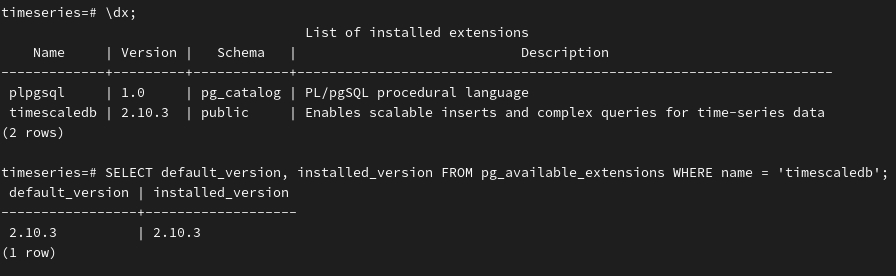
5.查詢 TimescaleDB 版本
timeseries=# \dx;
timeseries=# SELECT default_version, installed_version FROM pg_available_extensions WHERE name = 'timescaledb';